

Rifle Re-Barrelling the 'Hard Way'
- Details
- Tuesday, 06 May 2014
Chris Parkin has a go at re barrelling - 'The Hard Way'
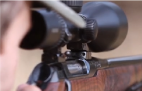
Well, it was a deer stalking and fox rifle but I think when this project is done, the role of this gun will change slightly. I received a 6mm/. 243 Bergara barrel from Brian Fox and chose to re-define the build of this rifle somewhat. It had served well for three years and had only cost me £250 so owed me very little but was now shot out. It was a Sporter barrelled Remington 700 CDL with a detachable magazine but it was going to morph into something a little more competition or at least long range vermin oriented. Up to now, a McMillan stock had been source and that, with a Jewel trigger, AI compatible bottom metal/magazine system, fully bedded was going to support a Remington varmint profile 26” Bergara barrel. Chambered in .243 Winchester again but this time with an 8” twist rate, it stood to be more suitable for the 105-107gr match bullets. It is often interesting to see if deliberately fast twist rates are still able to handle the lighter vermin loads without premature failure of the lighter expanding bullets, I find it can indicate the internal finishing quality of the barrel. The gun was no longer to be a stalker but a true varmint/target rifle and would hopefully be accurate, I certainly hoped better than in pure `Factory` fomat.
A lot to learn
 I had never even seen a barrel being chambered and fitted before, never mind done some of the work myself. I'm a Materials Engineer, competent tweaker, stock twiddler and mechanic but due to not having access to a lathe since school, never a machinist. I was warned what to bring with me (and clothing to wear) on THE DAY and that oil may well be erupting generously upon chambering. The first task to be handled was a few measurements of stock, barrel and chamber reinforce length to decide if we were to shorten the blank at all to make sure the minimum amount of stock inletting was needed although this stock was already profiled to accept a similar barrel. I was going to stick at 26” as you can normally shorten later but as this blank was fluted, there were only a couple of inches spare at the muzzle to trim. We needed to plan in advance if anything was to be taken off at the chamber end but I decided to stay at 26”. Weight would not be an issue and Velocity at long range is never to be ignored.
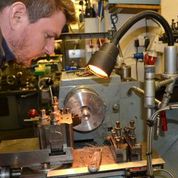
As many gunsmiths agree, the initial `clocking` of the barrel blank when inserted into the lathe is of paramount importance. At both sides of the headstock, Dial Test Indicators (DTI's) are used to centralise the bore, not the external profile of the barrel to ensure concentricity is as close to perfect as possible. This operation can be quick or slow and often depends how far the bore runs eccentrically to the external profile upon which the initial installation and setup stages take place. Some reports have told of Bergara's being a little sloppy in this concentricity arena but I was assured by Vince, who was patiently adjusting the 4 jaws of the chuck in 0.001” increments, that mine was pretty good.
This is an economy project
 At this point we should perhaps break to explain the economics of re-barrelling a rifle. Vince has all this gear and does this for fun, only upon his own guns and as he has oodles of time to spare, has no worries about doing this job in slow motion, taking the ultimate care and attention to detail in all machining stages, never needing to speed up rates of feed and the like to match the time=money criteria laid down by normal professional gunsmiths. He explained to me how the time and hence fee charged by various gunsmiths often varies widely, purely down to some of this balance and one other quite surprising fact........the action being re-barrelled. Much as he tried to avoid the issue, I know Vince loves Remingtons for the way they are the access route for many (including me) into this sport of ours, but as the consummate precision shooter, engineer and machinist, he winces at the thought of working with one. Had it been a BAT or Stolle, im sure his eyes would have glazed over and I now know partly why. I LOVE Remington 700's, at 50 years old this year they are the virtual granddaddy of nearly all modern precision rifles, their footprints and design ethos but, they are as individual as women, and in the same way, individually unique and `challenging`.
A love/hate relationship
 If you are working on a £1000 BAT action or something similar, the exact measurements, to within one ten thousandth of an inch, are all carefully laid down in the technical specification of the action, consistent from one action to its brother 3 years from now. When working with a factory rifle, such as the common Remington 700 used here, all the measurements to do with the thread on the barrel tenon, bolt nose clearance and headspacing of the cartridge must be done after taking careful measurements off the exact action being used. During the threading job on the tenon of a BAT, you virtually don’t need to have the action in the room, with a Remi (much as I adore them), the action is continually measured and offered up to its barrel thread to check fit and tolerances at all stages. I know any factory made mechanical component has a +/- x.xxx” tolerance on it but these are all unique. I have renewed respect and understanding for those who do this job day in and day out and if the same machining care and attention is given to both actions during a re-barrel job, the Remington WILL take longer if done to the same standard.
Quick, Quick, SLOWWWWW
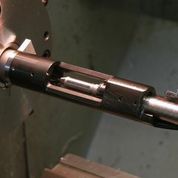
 Anyway, from back in September, the precise numbers of teeth per inch and diameter evade me but the barrel tenon (the section that screws into the action) is threaded and has a shoulder cut into it that will meet the face of the closed bolt with a few thousands of an inch to spare. Being a Remington, this face of the barrel, before chambering, needs to incorporate a bolt nose recess (part of the iconic `three rings of steel`) and allowance must also be made for the thickness of a recoil lug, in this case a precision ground stainless lug from Brownells in the United States. Machining techniques and styles are often personalised with experience but there are certain unbreakable rules associated with thread pitches, angles and feedrates for standards as near as perfect to be achieved. Vince had a few well thumbed, beautifully oil and fingerprint stained `bibles` of equipment settings and previously honed techniques to ensure not only correct specifications but also to put as little stress into the barrel being machined as possible. For example, by placing the barrel blank in the chuck slightly proud of where the reamer would penetrate, it would avoid infinitesimally small amounts of compression on the steel being cut. He has the time to be confident in his exclusion of all considered variables and if this means slowing down your feedrates, so be it because the offshoot of this extra extension means extra caution with all work further outboard of the chuck.
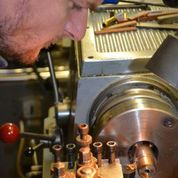
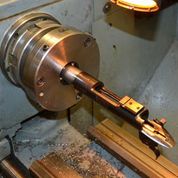
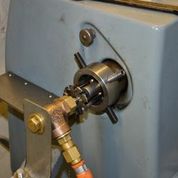
So, we now have a barrel that fits the action and bolt face, the next stage is to cut a chamber within it, concentric to the bore. This is where real patience comes in, as we were not using a cheap roughing out reamer to 90% rip out the chamber, but a final finishing reamer that must be driven more carefully to maintain the finish and of course, not destroy this precision tool. The .243 reamer was attached to the tailstock of the lathe, mounted in a floating reamer holder that allows the tail of the tool to position itself precisely to the last nth degree whilst it is guided from its tip by a bearing mounted 6mm mandrel, carefully selected and attached from a set that will closely and snugly slide within the rifling and bore. This guides the reamer along the bore centreline and prevents it from veering off course or `chattering`. At this point we also fitted a forced cooling nozzle to the muzzle end of the barrel (not yet finished or crowned). This would drive a pressurised stream of cutting fluid back towards the reamer and ensure that all cutting was both lubricated and ALL swarf was forced back along the flutes of the reamer to exit the barrel at the breech end. This prevents any swarf accumulating at the point it was being machined and causing scarring or galling. This Reamer is driven into the bore extremely slowly and smoothly and every 0.050” was withdrawn completely to inspect it, the chamber it was cutting and ensure the flutes were clean. A quick scrub with a toothbrush ensured nothing built up. Now during this withdrawal and re-insertion of the reamer, the cutting fluid pump must be turned off and on with careful timing as it can have a tendency to spray everywhere at the point just before the reamer fills the currently cut space. This works out at approximately 50-60 cycles and took over an hour. During all machining, the swarf produced is a good sign to the machinist of machining quality, if he can speed up or slow down the feedrates and is also a good indicator of the steel quality and consistency.
STOP
 Towards the end of this stage, we need to start checking where we need to STOP, i.e. set our headspace or in simplistic terms, the size of the chamber, relative between the shoulder and bolt face. To do this we use `Go` and `No-Go` gauges which are specific to cartridge chamberings. Basically, we want to continue cutting until when the barrel, recoil lug and action are screwed together, the bolt will close on the `Go` gauge but not with the `No-Go`. It sounds simple but you have to anticipate the amount that the barrel will nip up into the action when fully tightened so how many `thou` to leave spare to take this into account. This is a critical stage as if you go too deep, there is only one cure, that is to re-cut the barrel shoulder and start again but this is undesirable in terms of both time and physically, metal that has been removed cannot be glued back on. I doubt you will ever find a gunsmith who wants to be disturbed to any extent during these processes, all critical to 0.001”, never mind explaining it and teaching it along the way and bless Vince's patience, I buggered it up!
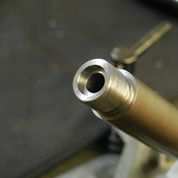
Vince is a true gent and basically returned back to the start to tweak a few details and eventually everything was perfect, a job we were both technically happy with, concentric, perfect headspacing and completed at the action/chamber end of the barrel. To finish the job, we removed the blank and turned it all round so that after re-`clocking` at both ends of the headstock, the muzzle thread could be cut for a moderator or muzzle brake and finally crowned, I went for a recessed crown due to this being a predominantly sporting rifle.
What the proof house does in engineering terms is dance a very fine line between `non-destructive` and `destructive` testing. Well my gun never got this far as it was returned untested after the trigger blade (thankfully I fitted a scrap bin item for this trip) was mysteriously snapped off somewhere along its otherwise comfortably undamaged journey to London and back. It was fitted with another trigger and sent back to proof and two months after its construction, it returned, this time also needing re-crowning but at least stamped with proof marks. A quick trip through the milling machine to relieve the stock for the larger recoil lug and then a full bedding job with pillars and Devcon finally had it ready to shoot.
Shooting Results
 As a test bench, this rifle is always being altered and fiddled about with and I certainly don’t have the experience and patience Laurie does to exhaustively test my own handloads once they are `good enough` for me, certainly in this case with field use intended. Covered in mud and dust, reliability is more important than sub 1/4” accuracy.
Every barrel will have it's own personal favourites and this one was no different. I started out using Lapua brass with CCI BR primers with Hodgdon H4350 powder driving 87gr Hornady V-max bullets. I thought this choice a perfect start for its longer-range varminting role and H4350 is a bit of a favourite of mine. I had acceptable accuracy at sub 1” at 100 yards but felt this gun capable of more and went through 70 and 75gr V-max along with their 105 A-max cousins. Powders both faster and slower were tried, Viht N140, N150 and N160 showed no gain. Frustration aside, a change of tack to Sierra bullets paid dividends, The 70gr Blitzkings, 100gr Soft points and most importantly, the 107gr Matchkings were now dipping consistently below the half inch mark, the 70's preferring H4350 and the 107's fairly characteristically liking H4831sc. For a bit of McQueen’s or tactical shooting, of which I am a fan, the 107's deserved further tweaking and seating depth alterations although not critical, did pay dividends. At 0.005” off the rifling, I was comfortably into the sub half inch zone consistently with forays well below 1/4”. Remember, this is not a heavy target competition gun with a custom or even blueprinted action, it is a plain Jane, and even with make up, still not terribly attractive but very serviceable and inexpensive. After running in the barrel, I have found the honed internal finish promised by Bergara has led to little fouling and very easy cleaning, so much so it has been a good indicator of which powders are burning cleanly and efficiently within its 26” finished length. The 8” twist has certainly had no problems stabilising the 107's and I might even be tempted to push my luck with some 115gr Dtac's. Testament to its clean buttoned bore, the 55gr Blitzkings which I do find a little tougher than the 58gr V-max, were holding together well in excess of 3900fps with no blow ups or close range fragmentation. The twist rate also perhaps led to slightly higher than expected velocities although this is possibly attributable to a large number of other factors but was not accompanied by any unwanted pressure signs. Certainly with the 100-107gr bullets I was 2 grains below accepted charge weights and still exceeding the expected velocities by over 50fps. For the odd deerstalking trip this gun may get used for on Roe, I'm not sure I can be bothered to reload as the Prvi Partisan (PPU) 100gr soft point ammunition was consistently 3/4” capable.
It's a Dog, but it's MY Dog
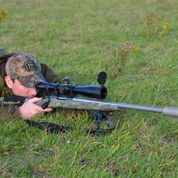 Im very pleased with the Bergara, as you can see from the photos, the looks of a rifle are of little importance to me when function is paramount and it is only going to get knocked around in the field. It is so far untested in competition but has performed well at ranges beyond 400 yards in field-testing and has since been again butchered, this time to add the AICS bottom metal and magazine. Shame my 260 is so bloody good, otherwise this `Light Tactical` gun as it has been christened, would show well as it can be either Braked or Moderated to minimise shot to shot movement during McQueen’s and those 107's at 3000fps are capable wind cheaters. I can’t take full credit for the fitting of the barrel but this gun will always be a gun I helped build, even if I only yanked on a lever 1/16” before the cutter crashed into the chuck, I don’t think I concentrated that hard on exams in the past?
My thanks to:
Vince Bottomley
Brian Fox for the Bergara barrel and proofing assistance, 0161 4308274
Stuart Anselm of Osprey Rifles for the loan of the reamer, `Go`/`No-Go` gauges and 2nd proofing adventure, 0161 408 3555
Henry Kranks for Sierra bullets and PPU ammunition, 0113 256 9163
Hannams Reloading for CCI, Lapua, Hornady and Vihtavouri products, 01977 681639